“Travel with Glass” has arrived!

While leading a Bret’s Table Culinary Tour through France our group stopped at a small Provençal winery. The wines were memorable, but so was the glass. Not too tall. No thick, factory rim. It felt right in my hand in a way most mass-produced wine glasses never do.

I wrapped it in a bandana and slipped it into my carry-on for the flight home. Of course my bag also held a slice of pâté en croûte and a crottin de chèvre because why not, you’re traveling from France! When dinner service came around mid-flight, drinking wine from a plastic cup felt like a crime. Out came my glass along with the pâté and cheese!

That wine glass became a regular travel companion. Wrapped in a bandana, it traveled back and forth across the pond, used on airplanes and in hotel rooms where the only options are often paper or plastic. Eventually, reality set in. One careless unzip or under-the-seat kick and I could be staring into a bag full of glass shards.

I searched everywhere for a single wine glass carrier. Plenty existed for two glasses, or carriers for a bottle with a glass, but nothing that was low-profile, packable, plastic-free, and sturdy enough to actually protect the glass. Camera lens cases came close, but never quite right. Too tall. Too narrow. Too bulky. Frustration won. So, I set out to make my own.

Prototypes began with stiff paper, graduated to cardboard, and evolved through months of trial, error, and more leather-crafting videos than I care to admit. I wanted something durable, elegant, and biodegradable. No plastic. No excess. Just thoughtful protection for a single wine glass that I now use when traveling, going on picnics, and now I even take to wine tastings.

After months and countless iterations, Bret’s Table: “Travel with Glass” is here and for sale. Each carrier is hand-crafted in leather, hand-punched, and hand-sewn by me. It includes the same style wine glass that is shown. Good wine after all, deserves a proper wine glass, even at 35,000 feet. Hey, even mediocre wine tastes better in glass. Cost: $299.00 USD plus Tax, S & H.

Impress your friends and travel companions. You can fly coach and still be bougie. Flight attendants definitely love them. It’s one less plastic cup they have to discard!

Carrier size, approx – 8.50″ x 4.25″. Glass – 7″. Total Weight – 1.8 lbs

David Paul Schmit Photography

Posted in General Blog, On The Table, Wines and Pairings | Comments closed

Banana (Nut) Bread

This recipe is adapted from an America’s Test Kitchen version. I used frozen bananas, which is great to just stash over-ripe bananas in the freezer. However, I found out the hard way is that it’s no fun peeling* them once they have thawed. Your best bet is to peel and then freeze them, preferably on a silpat-lined sheet pan. You don’t want them to freeze to the pan. Once frozen you can pop them in a freezer bag and freeze until ready to use.

5 large frozen and thawed very ripe bananas (about 2 1/4 pounds), peeled*
8 tablespoons (4 oz, 113 g) unsalted butter, plus enough to grease pan
2 large eggs, room temperature
¾ cup (5 1/4 oz / 150 g) packed light brown sugar
1 teaspoon vanilla extract
1 ¾ cups (8 3/4 oz / 248 g) unbleached all-purpose flour
1 teaspoon baking soda
½ teaspoon kosher salt
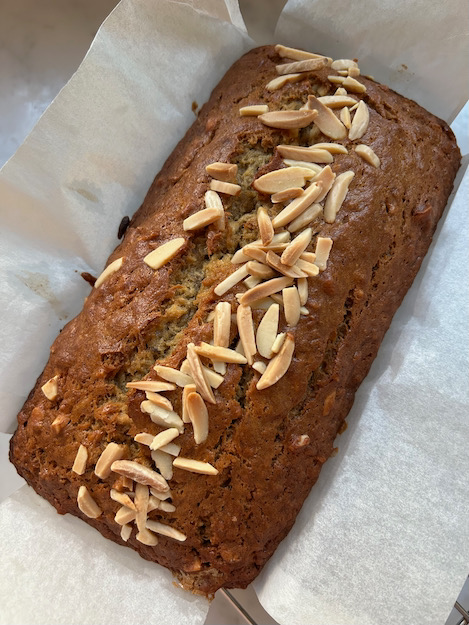
½ cup (1.5 oz) slivered almonds or walnuts, toasted and coarsely chopped, optional
2 tablespoons slivered almonds for garnish, optional (see photo)

Place 5 frozen bananas in a large sieve or strainer over a large bowl and allow to thaw. Catch any liquid, place in a small saucepan, and reduce to ¼ cup. After the bananas have thawed and drained, tip them out into the bowl and mash them with a fork. Pour in the reduced banana liquid. Set aside. In the same saucepan, melt 8 tablespoons of butter and cool slightly.

Adjust oven rack to middle position and heat oven to 350 degrees F. Spray 8½ by 4½-inch loaf pan with nonstick cooking spray or smear with a bit of butter and line pan with parchment paper. Set aside.

After the butter has cooled, whisk it into the banana mixture. Then, one at a time, whisk in eggs, then brown sugar, and vanilla extract. Set aside.

In another large bowl, whisk together all-purpose flour, baking soda, salt.

Pour banana mixture into flour mixture and stir until just combined. Gently fold in ½ cup toasted almonds, if using. Scrape batter into prepared pan and smooth top. Sprinkle with additional slivered almonds if desired.

Bake until toothpick inserted in center of loaf comes out clean, 55 to 75 minutes. Cool bread in pan on wire rack 15 minutes.

Remove loaf from pan and continue to cool on wire rack. Serve warm or at room temperature. Let cool completely and then wrap tightly with plastic wrap. Enjoy now, within 3 days or wrap again and store in the freezer for 1 month.

Posted in Recipes, Snacks | Comments closed

Cacio e pepe – A variation on this Italian classic pasta dish

On a recent CBS Sunday Morning episode, there was a segment demonstrating how this Italian classic is made. If adhering to the authentic Italian recipe, the ingredients are salted water, freshly ground black pepper, and Pecorino Romano.

Without Ancestry.com, I can neither confirm nor deny any Italian roots, but let’s just say I don’t have any. Therefore, I’m taking liberties by adding a bit of olive oil and butter without my Nona chastising me. And just to put some Italians over the edge, I also added a squeeze of fresh lemon juice to the finished pasta and enjoyed it with sautéed shrimp.

Though few, quality ingredients are a must!

The chef on the segment used an immersion blender to mix a bit of pasta water to the cheese and pepper before adding it to the pasta. However, doing this would prevent the ability to “bloom” the pepper, which I find adds substantial flavor.

In addition, somewhere along the way I ran across the suggestion that two pans be used; one for cooking the pasta and the other to finish the cooking. The reason is that generally, the pan that is used to cook the pasta is too hot and therefore the cheese will likely seize up instead of melt properly. I took that suggestion, and the finished dish was perfect.

*Since I added shrimp; I heated a tablespoon each of olive oil and butter in the skillet and sautéed 8 large peeled and deveined shrimp just until cooked through. After cooking, I set the shrimp aside on a plate, and proceeded with the recipe below.

The shrimp and “bloomed” pepper.

Cook the pasta in as little water as possible.

Serves 2

3 tablespoons (60ml) extra-virgin olive oil, or to taste, divided
2 tablespoons (30g) unsalted butter, or to taste
1 ½ teaspoons coarsely ground black pepper, divided or to taste
2 teaspoons kosher salt
½ pound (225g) spaghetti
2 ounces Pecorino Romano cheese (about 1 cup; 55g), very finely grated on a Microplane or the smallest holes of a box grater, plus more for serving
Juice from ½ a lemon

*Place a medium skillet (I used a 10-inch, non-stick) over medium-low heat and add 2 tablespoons olive oil and 1 tablespoon butter. Add about a teaspoon of freshly ground black pepper and allow the pepper to bloom, becoming fragrant and barely start to sizzle, about 1 minute. Remove skillet from heat and set aside.

In a large skillet, add about 2 inches of water and salt and allow water to come to a boil. Add spaghetti and occasionally jiggle with a fork or a pair of tongs to prevent the pasta from sticking together. (Cooking the pasta using a little water as possible concentrates the starch, which helps thicken the sauce when the pasta water is added later.) Cook until spaghetti is al dente (typically about 1 minute less than the package recommends). Transfer 2 to 3 tablespoons of pasta cooking water to the skillet with the olive oil/butter/pepper mixture. Return the skillet to medium low heat and stir in any remaining butter. Using tongs, lift spaghetti from the pasta water and transfer it to the oil/butter mixture.

Add cheese and remaining olive oil, if desired, to the skillet and stir with the tongs until cheese is completely melted.

Add a few more tablespoons of pasta water to the skillet to adjust consistency, continue heating as necessary until the sauce is creamy and coats each strand of spaghetti. Taste and season, if necessary, with additional salt and black pepper and a squeeze of lemon. Serve immediately, passing extra grated cheese at the table.

Posted in General Blog, Ingredients, Main Courses, Recipes, Snacks | Comments closed

Mashed Potatoes Croquettes

With the cost of groceries these days, I wasn’t about to toss a container of leftover mashed potatoes. I do realize croquettes are generally shaped more like a tater tot, but a mashed potato patty just doesn’t sound appetizing. Regardless of what you call them, they are delicious and the perfect accompaniment  for a seared chicken breast, on a bed sautéed Brussel Sprouts, and served with a quick horseradish sauce. Also add whatever cheese you may have in the fridge whether it be gruyere, comté, chèvre, or cheddar. As always the better the ingredients the better the outcome.


1/2 cup (2 oz) gruyère
3 cups (22.5 oz) leftover mashed potatoes
¼ cup (1 oz) All-purpose flour
1 large egg
1 teaspoon chopped fresh thyme or 1/4 teaspoon herbes de Provence
Kosher salt and freshly ground black pepper to taste
Vegetable oil for frying

Preheat oven to 200 degrees F. Line a sheetpan with paper toweling.

In a large bowl, grate the cheese. Add the mashed potatoes and using a fork mash them up well to break up any clumps. Add the flour, egg, and herbes.

Stir all the ingredients together very well until everything is fully incorporated and the mixture is smooth.  Form the mixture into 12 croquettes (patties).

Heat a large non-stick skillet over medium heat and add the vegetable oil. Fry the croquettes in batches (don’t overcrowd your skillet!) for about 5 minutes per side or until golden brown and completely cooked through. Remove to the sheetpan and place in oven to keep warm until ready to serve.

Posted in General Blog, Ingredients, Recipes, Sides | Comments closed

Belgian Spice-Almond Cookies (Speculoos)

Another advantage of weighing dry ingredients, particularly flour is that one recipe writer will consider 1 cup to be equal to 4.5 ounces. Whereas, another writer will decide that 1 cup of flour equals 5 ounces. However, if you weigh the flour it will always be the same amount regardless of how many measuring cups you use.

In my recipes 1 cup of flour equals 4.5 ounces using the spoon and sweep method (using a whisk fluff the flour in your flour bin, spoon flour into a dry measuring cup to overflowing and sweep off the excess with a bench scraper or the back of a flat edged knife).

The same is true when measuring sugar* if you weigh the sugar, 6 ounces will always be 6 ounces. Get yourself a scale and start weighing ingredients instead of using measuring cups!

David Schmit Photography

1 2/3 cups (7.5 oz/215 g) unbleached, all-purpose flour
½ cup (2 oz/55 g) almond flour
5 teaspoons (10 g) ground cinnamon
1 teaspoon ground cardamom 
¼ teaspoon ground cloves 
¼ teaspoon baking soda 
¼ teaspoon baking powder
¼ teaspoon kosher salt 
¾ cup (6 oz/170 g) turbinado sugar*, Belgian candi sugar, or 3/4 cup + 3 tablespoons packed light brown sugar
8 tablespoons (4 oz/113 g) unsalted butter, cut into ½-inch pieces and chilled
1 large egg, beaten
¼ cup sliced almonds (preferably blanched)

Using a sharpie and a ruler, draw 10 x 13-inch rectangle in the center of each of 2 large sheets of parchment paper, crisscrossing lines at the corners to use as a guide when rolling out dough. Set sieve over medium bowl and sift together the flours, cinnamon, cardamom, cloves, baking soda, baking powder, and salt. Set aside.

If using turbinado sugar, process in food processor for 30 seconds (the end result grain size may be different than granulated sugar, and that’s okay). If turbinado sugar is not available, use light brown sugar, and skip the sugar grinding step. Add butter pieces and process until a uniform mass forms and no large pieces of butter are visible, about 30 seconds, scraping down sides of bowl as needed. Add egg and process until smooth and paste-like, about 10 seconds, again scraping down sides of bowl as needed.

Add sifted flour mixture and process until no dry flour remains but mixture remains crumbly, about 30 seconds, scraping down sides of bowl as needed. Tip out dough onto a smooth surface and using the palm of your hand, smear the dough away from you, then gather it back with a bench knife. (This is a french baking technique called fraisage.)

Place 1 piece of parchment paper on counter with sharpie side lines facing down. Place dough in center of marked rectangle and press into 6 by 9-inch rectangle. Place second sheet of parchment paper over dough, with sharpie side lines facing up, so dough is in center of marked rectangle. Using the marks as a guide, use rolling pin and bench scraper to shape dough to the 10 x 13-inch rectangle of even thickness.

Remove the top piece of parchment paper. Sprinkle sliced almonds evenly over the dough. Replace parchment paper and gently roll the almond slices to press into the dough. Transfer dough with the parchment paper to a rimmed baking sheet. Refrigerate until dough is firm, at least 1½ hours (or freeze for about 15 minutes). Rolled out dough can also be wrapped in plastic wrap and refrigerated for up to 5 days.

Transfer chilled dough to counter. Gently peel off top layer of parchment from dough. Using fluted pastry wheel (or sharp knife or pizza cutter) and ruler, trim off any rounded edges of dough that may have extended over the marked edges of the 10 x 13-inch rectangle. Cut dough lengthwise into 8 equal strips about 1¼ inches wide. Cut each strip crosswise into 4 equal pieces about 3 inches long. Return dough to the refrigerator or freezer (for another 15 minutes or so).

When ready to bake off, adjust oven racks to upper-middle and lower-middle positions and heat oven to 300 degrees F. Line 2 baking sheets with parchment paper or silpats (or even better, perforated silpats).

Using an off-set spatula, transfer the chilled cookie dough to prepared sheetpans, spacing them at least ½ inch apart. Bake until cookies are lightly and evenly browned, 20 to 25 minutes, switching and rotating sheets halfway through baking. Let cookies cool completely on the sheetpan, about 20 minutes. Cookies can be stored at room temperature for up to 3 weeks.

Posted in Cooking Classes, Desserts, General Blog, Ingredients, Recipes, Snacks | Comments closed

Classic Shrimp Cocktail

Photography, Jane Shortridge

In about an hour you can have an elegant first course for your fanciest dinner party, lunch with Bloody Marys on a pontoon boat or brunch on the deck of a friend’s cabin enjoyed with a  Hugo Spritz. We enjoyed all three this summer.

Makes 4 substantial first course servings
10 cups cold water
2 medium carrots, quartered
2 stalks celery, quartered
1 large yellow onion, quartered
3 – 4 cloves garlic
1 lemon, halved; preferably organic
2 sprigs parsley
5 sprigs fresh thyme
2 bay leaves
1 teaspoon whole black peppercorns
1 tablespoon Old Bay Seasoning (optional)
16 large (just over a pound) shrimp, in the shell, rinsed

Lemon wedges and cocktail sauce for serving

Make an ice bath and set aside.

Put the water, carrots, celery, onion, garlic, lemon, parsley, thyme, bay leaves, peppercorns, (and Old Bay Seasoning if using) in a large saucepan and bring to a boil over high heat. Lower the heat to a simmer between 10 to 30 minutes.

Drop the shrimp into the liquid, immediately turn off the heat and cover with a lid. Allow the shrimp to cook in the hot liquid, stirring occasionally, until they curl and turn pink, about 3 – 4 minutes. Using a pair of tongs, fish out the shrimp and place in the ice bath. Strain the broth (aka court bouillon) and reserve/freeze for other uses, like when making seafood risotto.

Peel the shrimp and remove the vein along the curve of the shrimp. Refrigerate if not serving right away. If refrigerated, bring the shrimp to room temperature about 15 – 20 minutes before serving.

To serve put your favorite cocktail sauce in a medium bowl and surround with the shrimp on a bed of crushed ice or loop the shrimp over the edge of an individual cocktail glass and top with the sauce. Garnish with the lemon and serve.

Posted in Appetizers, Recipes | Comments closed

Fresh Corn Vichyssoise

Photography, Tracy E. Tracy

It’s peak sweet corn season here in the midwest and there’s nothing better then roasting a few ears on your Weber Grill. However, when you tire of roasted corn of the cob making this cold soup is a delicious alternative. With the addition of, potatoes, yellow jalapeños, yellow squash, and English cucumber, the recipe is a cross between gazpacho and a classic vichyssoise but with a kick.

Makes about 2 quarts

1 large leek
2 tablespoons unsalted butter
1 celery stalk, chopped
2 – 3 yellow Jalapeño peppers or to taste based on heat tolerance
1 large yellow bell pepper, chopped
2 – 3 garlic cloves, chopped
1 medium Yukon Gold potato, peeled and diced
6 ears of corn (about 5 cups or 2 lbs kernels)
1 medium yellow squash, diced
6 cups vegetable or corn stock, preferably homemade
½ large English cucumber, peeled, de-seeded, and chopped; about 1 cup
Kosher salt and freshly ground pepper
½ – 1 cup cream, or to taste

Garnishes
Snipped fresh chives
Quartered yellow cherry tomatoes
Crème Fraîche or heavy cream
Garlic Croutons

Trim and discard root ends and the dark green tops, reserving the white and light green parts of the leeks. Halve leeks lengthwise, then cut into ¼-inch slices. Add them to a large bowl of cold water swishing them around to dislodge any dirt that may be lurking inside the leaves. Carefully lift the leek slices out of the water, leaving the grit behind and drain in a colander.

Heat butter in a large pot over medium heat. Add leek, celery, jalapeños, and bell pepper. Cook, stirring, until softened, about 6 minutes. Add garlic and cook for another minute or so. Add potatoes, corn kernels, squash, and 6 cups vegetable or corn stock or enough to cover vegetables. Bring to a boil, then reduce to a simmer and cook until vegetables are very tender, about 25 minutes. Add cucumber and cook for another minute or so.

Allow to cool for about 15 minutes. Working in batches (do not fill jar more than halfway), purée soup in a blender until smooth. Cool to room temperature and then refrigerate until cool about 4 hours or better yet overnight. When ready to serve, thin soup to desired consistency with cream or cold water, if needed. Serve with any or all garnishes to your heart’s content.

Freeze any remaining vichyssoise for up to one month. When ready to serve, thaw the vichyssoise in the refrigerator overnight and then then with a bit of cream or cold water to your desired consistency and serve.

Posted in General Blog, Ingredients, Soups | Comments closed

Vichyssoise with a Twist

Makes about 12 cups (3 quarts)

This recipe is a variation of one from Food & Wine magazine and can easily be cut in half depending on how many folks you are serving and the portion for each person. I made it ahead of time and took it to enjoy at a friend’s cabin as a first course. It was easy to transport in a small cooler along side the frozen shrimp, cocktail sauce, and bloody mary mixer we also enjoyed that weekend.

2 large (10-ounces) leeks
2 -3 garlic cloves, or to taste, chopped
2 teaspoons kosher salt, plus more to taste
¼ cup unsalted butter (2 ounces)
4 cups lower-sodium vegetable broth or chicken broth, preferably homemade
1 cup water, or as needed
1 pound Yukon Gold potatoes, peeled and chopped (about 2 1/2 cups)
1 medium zucchini, ends removed and chopped
1 ripe avocado
1/8 teaspoon freshly grated nutmeg (optional)
1 cup heavy cream
Freshly ground black pepper, to taste

Garnishes – you’ve got options
Minced fresh chives
Chopped fresh parsley
Chopped fresh dill fronds
Garlic croutons
Shaved pecorino Romano cheese

Trim and discard root ends and the dark green tops, reserving the white and light green parts of the leeks. Cut leeks in half lengthwise, then cut into ¼-inch slices. Add them to a large bowl of cold water swishing them around to dislodge any dirt that may be lurking inside the leaves. Carefully lift the leek slices out of the water, leaving the grit behind. (You should have about 7 cups sliced leeks.)

Melt butter in a large saucepan over medium heat. Add leeks and a pinch of salt, cook, stirring often, until leeks are softened but have not caramelized, about 7 minutes. Add the chopped garlic and continue to cook until softened, about another minute.

Add broth, potatoes, and water to cover. Bring to a simmer over medium heat. Reduce heat to low and simmer, uncovered, until potatoes are almost tender, about 25 minutes. Add chopped zucchini and continue to cook. Peel and chop avocado, add to leek mixture. Continue to cook for another 5 minutes or until potatoes and zucchini are tender. Remove from heat and add grated nutmeg (if using) and allow to cool about 10 – 15 minutes.

Working in batches, ladle the leek mixture into a blender. Place lid on blender leaving a bit of a gap to allow steam to escape. Place a clean towel over the lid and process each batch until completely smooth.

Transfer puréed soup to a heatproof bowl and add the cream. Refrigerate, uncovered, until completely cold, then transfer to lidded containers and continue refrigerating at least 4 hours or up to 3 days.

When ready to serve, remove soup from refrigerator. Add additional salt and pepper to taste. Ladle desired amount evenly among bowls. Garnish with any of the suggestions.

Make Ahead 
Any remaining soup can be frozen for a month. The day prior to serving, thaw in the refrigerator overnight. Add a bit of cream or cold water to the desired consistency and serve.

Posted in Appetizers, General Blog, Ingredients, Recipes | Comments closed